NOTE
This article updates the previous blog on Java and Android Studio on Ubuntu 14.04 (Trusty Tahr). Oracle's Java is now at version 66 and Google's Android Studio is now at version 1.5.1. This is in addition to Ubuntu which is now at version 14.04.3. Due to these changes, I have decided to update this article.
This article is a ‘how-to’ for installing Oracle’s Java JDK 8u66 (or SE 8u66) and Google’s Android Studio 1.5 on Ubuntu Linux 14.04.3 (Trusty Tahr). If you wish to develop software on the Android platform on your Ubuntu 14.04.3 PC, then this ‘how-to’ is for you. Note that most necessary steps are performed at the command line in a terminal – if you are not familiar with this, I suggest reading about it first before trying out this ‘how-to’.
STEP 1: Install Oracle’s Java SE (or JDK) 8
First you should be aware that there is no Java installed on a freshly installed Ubuntu 14.04.3. This can be verified by executing the following in a terminal:
java -version
The output is as follows:
The program 'java' can be found in the following packages:
* default-jre
* gcj-4.8-jre-headless
* openjdk-7-jre-headless
* gcj-4.6-jre-headless
* openjdk-6-jre-headless
Try: sudo apt-get install <selected package>
Notice from the output that there is no mention of Oracle’s Java at all. So why install Oracle’s Java? Why not OpenJDK? Good questions and the answer is that Oracle’s Java is recommended by Google. Should you plan to use Java for Android programming, then Google says it is better to use Oracle’s version – their Android Studio says that there are stability issues with OpenJDK. Whether this is true is a moot point here – if you do plan to do Android programming later, then install Oracle’s Java – else, any Java will do, even OpenJDK.
This article assumes that there is no Java installed on your Ubuntu 14.04.3 PC. If you had installed other Java previously, then you need to make a decision – keep that Java and install Oracle’s Java or remove that Java and install Oracle’s Java in its place. That decision is entirely up to you but you need to remember that Google’s Android Studio recommends Oracle’s Java.
Point your web browser to the Oracle SE download page here and download the latest version of the 64-bit JDK (not Server JRE or the JRE) – currently at version 8u66 (or 1.8.0_66). It is also recommended that you download the API documents, demos and samples for the JDK – although this is not required for Android development on Android Studio. Once the packages have been downloaded, execute the following commands:
cd Downloads
tar xzvf jdk-8u66-linux-x64.tar.gz
tar xzvf jdk-8u66-linux-x64-demos.tar.gz
unzip jdk-8u66-docs-all.zip -d jdk1.8.0_66
The last two commands in the above is only applicable if you have downloaded the demos and the documentation. The second command above will create a ‘jdk1.8.0_66’ directory in the Downloads folder while the last two commands above (if applicable) will create the ‘sample’, ‘demo’ and ‘docs’ directories under the ‘jdk1.8.0_66’ directory in the Downloads folder.
Now execute the following commands:
sudo mkdir /usr/lib/jvm/
sudo mv jdk1.8.0_66/ /usr/lib/jvm/
cd ~
The first command will create the ‘/usr/lib/jvm’ directory. The second command will move the whole ‘jdk1.8.0_66’ directory to ‘/usr/lib/jvm’ – where the root of all Java related files resides. The last command will place you back into your home directory.
Note that you are free to decide where to place the ‘jdk1.8.0_66’ directory – even your home directory! However the ‘jdk1.8.0_66’ directory in ‘/usr/lib/jvm’ is highly recommended as this will be in line with other Linux distro’s placement of the Java files. This whole article reflects that recommendation.
Notice that the owner and group of the ‘jdk1.8.0_66’ directory is still in your name and group. You can keep it as it is if you are the only user of the PC or you can set this to root by executing:
sudo chown -R root:root /usr/lib/jvm/jdk1.8.0_66
The contents of the ‘/usr/lib/jvm’ directory after STEP 1 is completed should be like this:
drwxr-xr-x 5 root root 4096 Jun 24 14:55 .
drwxr-xr-x 183 root root 20480 Jun 24 14:06 ..
drwxr-xr-x 11 root root 4096 Jun 24 14:55 jdk1.8.0_66
Notice that there is only one directory there – the ‘jdk1.8.0_66’ directory.
STEP 2: Set Up Default Java To Oracle’s Java JDK 8
The next thing to do is to tell Ubuntu 14.04 where Oracle Java JDK resides and set up a default Java. For this we use the ‘update-alternatives’ command. Execute the following command from the terminal (note that the command is on a single line):
sudo update-alternatives --install "/usr/bin/java" "java" "/usr/lib/jvm/jdk1.8.0_66/bin/java" 1500 --slave "/usr/share/man/man1/java.1" "java.1" "/usr/lib/jvm/jdk1.8.0_66/man/man1/java.1"
These will install all the necessary links to Oracle’s Java, including a slave link for the ‘man’ pages for Java. After the command has been executed, the default Java was automatically set to Oracle’s Java.
To verify that all have been set correctly, you can use the following commands:
update-alternatives --display java
If the output to the query above looks like this
java - auto mode
link currently points to /usr/lib/jvm/jdk1.8.0_66/bin/java
/usr/lib/jvm/jdk1.8.0_66/bin/java - priority 1500
slave java.1: /usr/lib/jvm/jdk1.8.0_66/man/man1/java.1
Current 'best' version is '/usr/lib/jvm/jdk1.8.0_66/bin/java'.
then everything have been set correctly. A quick check on the current version of the Oracle’s Java can be performed by executing the following command in a terminal:
java -version
If the output for the command is:
java version "1.8.0_66"
Java(TM) SE Runtime Environment (build 1.8.0_66-b14)
Java HotSpot(TM) 64-Bit Server VM (build 25.45-b02, mixed mode)
then Oracle’s JDK 8 has been set up properly.
STEP 3: Set the System's Environment Variables and Paths
Now we have to set the environment variables and paths correctly for the whole Ubuntu 14.04 system. Execute the following command:
sudo nano /etc/profile
This will execute the nano text editor and open the ‘/etc/profile’ file for editing. Now add (or edit) the following lines at the end of the file.
export JAVA_HOME=/usr/lib/jvm/jdk1.8.0_66
export PATH=$PATH:$JAVA_HOME/bin
Save the file and close it. Note that, upon system startup, these will set the JAVA_HOME and PATH environment variables for the whole system. The JAVA_HOME environment variable points to the JDK root while the PATH environment variable will add the ‘/bin’ directory of the JDK to whatever path that has already been specified. This will enable the ‘javac’ (the Java compiler) command to be executed from any directory. Note that the ‘javac’ command is not essential to Android software development, but it could prove useful if you are running Java programs from a terminal. It also would be useful if you are new to Java and wish to test software from the command line during the learning process.
Now log out and then log in again to the system in order to make sure that both the environment variables are set. Check that you have correctly installed Oracle Java by executing the commands (one by one) in a terminal:
echo $JAVA_HOME
echo $PATH
java -version
javac -version
If you see the string ‘jdk1.8.0_66’ in the output to the above commands, then you have successfully installed Oracle’s SE 8.
Now whenever Oracle issue an updated Java version, all you have to do in order to use the new version of Java SE is to follow STEP 1, STEP 2 above and this step (STEP 3). Just make sure that you change the version number to the new version in the commands shown above. However, you do not have to re-create the ‘/usr/lib/jvm’ directory as it already exist. Also make sure that you remove the links to the old version of Java by using the ‘sudo update-alternative --remove-all java"’ command before implementing the links to the new version of Java in STEP 2.
STEP 4: Install 32-Bit Libraries
Since you are using the 64-bit version of Ubuntu 14.04, it is important to note that Android Studio requires the 32-bit libraries to run properly. Although this requirement is not clearly stated under ‘System Requirements’ of Android Studio’s download web page, the clue is obtained from the message ‘Tested on Ubuntu® 14.04, Trusty Tahr (64-bit distribution capable of running 32-bit applications)’. The standard installation of a 64-bit Ubuntu 14.04 DOES NOT have the capability of running 32-bit applications, instead you must manually install the necessary packages by executing the following:
sudo dpkg --add-architecture i386
sudo apt-get update
sudo apt-get install libc6:i386 libncurses5:i386 libstdc++6:i386 lib32z1
Note that, if you fail to install these packages, you will not be able to use Android Studio without running into errors.
STEP 5: Install Google's Android Studio
Point your browser to here and click on the big green button and then agree to the terms. Click on the download button and wait for the download to finish. Then start a terminal and execute the following command:
unzip Downloads/android-studio-ide-141.2456560-linux.zip
This will decompress the contents of the zip file downloaded into a new directory called ‘android-studio’ which can be found in your home directory. To start Android Studio setup, execute the following commands, one by one:
cd android-studio/bin
./studio.sh
A window similar to the one shown below will appear asking whether you would like to import any settings. If this is the first time you are using Android Studio, it will be likely that you don’t have anything to import. However, if you are moving from an older version of Android Studio, you may want to keep any settings made previously – in this case specify the location of the settings and let the setup wizard do the job of importing all the old settings.

Click on the ‘OK’ button to proceed. Android Studio will begin loading as shown in the figure below.

After a while, the Setup Wizard screen similar to the one shown below, will appear. Note that a warning message that MAY appear on this window: ‘IBus prior to 1.5.11 may cause input problem. See IDEA-78860 for details.’ Click on the link ‘IDEA-78860’ and then read the suggested workarounds on the web page that appears. The solution suggested is to either upgrade IBus to version 1.5.11 or add ‘export IBUS_ENABLE_SYNC_MODE=1’ to the ~/.profile, then restart a session. You can also disable the warning by clicking on ‘Do not show again’ sign. For this article, the author decided to add the export to the ‘.profile’ file, log out and log in again. DO NOT PROCEED UNTIL THIS WORKAROUND IS IMPLEMENTED! After this was done, a log out and log in was performed, Android Studio was started again and the Setup Wizard screen will be shown again. The ‘Next’ button was clicked in order to continue.

The next screen similar to the one shown below will appear. The Standard type of setup is already selected – this is recommended unless you want to customize the setup. Click on the ‘Next’ button and the the next screen will appear.

The next screen (see below) is the ‘Verify Settings’ window where you will find settings like the setup type, the destination folder, and the SDK components to be downloaded next, plus the total size of the downloads. Click on the ‘Next’ button and the the next screen will appear.

If you have Intel’s Virtualization Technology enabled in your PC BIOS and Linux kernel, then it will be detected as shown on the wizard’s screen. You can read up more on this technology at the URL shown on the screen. Then click on the ‘Finish’ button.

The SDK components mentioned in the ‘Verify Settings’ window will begin downloading as shown below. Wait for the download and installation of the SDK components to finish.

Once downloading and installation is completed, a log window will appear as shown. Note that this log window is where any error messages, if any, will be displayed. Assuming that the log window does not display any error messages, click on the ‘Finish’ button.

The next screen shown is the Android Studio Welcome Screen itself (shown below). You have now successfully installed Android Studio on your Debian 8.2 PC.

Notice the text ‘Check for updates now’ on the last line of the window - click on ‘Check’ and if you already have the latest version, a window similar to the one shown below will pop-up. Click on the ‘Close’ button to dismiss the notice.

If there are any updates, a screen similar to the one shown below, will appear. Click on the ‘Update Now’ button and the process of downloading and applying the updates will begin (see below) – wait for the process to finish and then click the ‘Finish’ button on the ‘SDK Quickfix Installation’ window (see below).


From now on, you should make it a habit to check for any updates to Android Studio (by clicking on ‘Check’) every time you launch it.
Remember that, at the moment, you have to start a terminal, change to the correct bin directory and then launch ‘studio.sh’ in order to start Android Studio. Surely there must be an easier way and there is! But, in order to implement the easier way, there are two things that must be done initially.
The first is to create a launcher item in the Unity launcher. This is easily accomplished by right-clicking on the Android Studio icon in the launcher and click on the ‘Lock to Launcher’ item. The Android Studio launcher (as shown by the green arrow in the screenshot below) will then remain permanently in the launcher until you remove it. You can now close Android Studio by clicking on the ‘x’ on the top left hand corner of the window. Ignore any warnings on the terminal and close it too.

The second is to edit the ‘Desktop Entry’ text file for the Android Studio launcher. Launch a new terminal and execute the following:
nano .local/share/applications/jetbrains-studio.desktop
Remember that this command is all on one line and don’t forget the dot (or period) before ‘local’ – this is NOT a typo as ‘.local’ is a hidden file. The contents of that file need to be edited as follows:
- Remove the ‘Setup Wizard’ from the ‘Name’ item if it is there and replace it with just ‘Android Studio’. If the name is already set, you can skip this step.
- Edit the ‘Exec’ item to ‘/home/(login name)/android-studio/bin/studio.sh’ (replace (login name) with your login name – in case you forgot, this is the same login name as the ‘Path’ item on the previous line). Note that the unedited line is for the setup command and is rather long – make sure that you remove it completely before entering the new command.
- Insert a line after the ‘Exec’ line, and type ‘Terminal=false’.
- Leave the rest of the items unchanged. The final file will look something like this:


Save the file and exit nano and the terminal. To test whether the launcher works, click on the launcher – Android Studio should open. If not, check your Desktop Entry file again.
If you want to launch Android Studio from anywhere using ‘studio.sh’, it is recommended that the system wide path include the ‘android-studio/bin’. To do this, execute this command in a terminal:
sudo nano /etc/profile
In the ‘profile’ file make sure to include the ‘android-studio/bin’ in the PATH – for example:
export PATH=$PATH:$HOME/android-studio/bin
If you have already implemented the path to JAVA_HOME (as in STEP 3), then the new line should look like this:
export PATH=$PATH:$JAVA_HOME/bin:$HOME/android-studio/bin
Save the file and close nano. To make sure that this new path takes effect, log out and then log in again. Now you can launch ‘studio.sh’ in a terminal from any directory.
STEP 6: Configure SDK Manager
Launch Android Studio again if not already started. On the Welcome Screen and under ‘Quick Start’ of Android Studio, click on ‘Configure’ and the ‘SDK Manager’ items as indicated by the green arrows in the figure below. The Default Settings screen will be shown (see below) next.


Click on ‘Launch Standalone SDK Manager’ and it will start (see below) and if there are any update packages, it will be shown on the ‘Install xx packages...’ button (where xx = number of update packages).

Click on that button, and the ‘Choose Packages to Install’ window will appear as shown below. Click ‘Accept License’ for all the items followed by a click on the ‘Install’ button.

The SDK Manager window will re-appear and the packages will be downloaded and installed as shown below. Wait for this process to finish.

Now it's time to check what has been installed so far. On the SDK Manager window all installed packages are marked ‘Installed’ under the ‘Status’ column. Note that SDK packages has already been installed for Android 6.0 Marshmallow (API 23) – the latest Android version from Google. Other packages may have already been installed – just check the ‘Status’ column.
Depending on what Android devices that you wish to develop software for, you may wish to install additional packages for that device. For example, the author has an Android smartphone running Android version 4.4.2 (KitKat), so the packages marked as shown below, was selected to be installed. The ‘Install xx packages...’ button was then clicked upon and the packages were downloaded and installed. Do not close the SDK Manager yet.


STEP 7: Starting the AVD Manager
Click on ‘Tools’ and ‘Manage AVDs...’ from the Android SDK Manager menu and the Android Virtual Device (AVD) Manager window similar to the one shown below will appear.

Notice that there is no AVD's defined by default. This differs from previous versions of Android Studio where Google supplied one pre-defined AVD called ‘Nexus_5_API_22_x86’. For some reason or other, it was removed from the list of AVD's supplied. Note that if you had installed a previous version of Android Studio and updated it to the latest version, this pre-defined AVD will be removed. Since all the AVD creation tools are supplied, it will be easy to recreate this AVD – but for this article we will ignore this AVD and continue with creating an AVD to correspond to your actual Android device.
Notice that there is another tab labeled ‘Device Definitions’. Clicking on this tab will show a window similar to the one below and they contain a list of generic AVD device definitions. You can use this list as a starting point for creating your own AVD. Note that the majority of the devices listed are by Google – although you can find some generic devices at the end of the list (sorted by screen sizes).

STEP 8: Creating An AVD
If you have an Android device that is listed in ‘Device Definitions’, all you need to do in order to create an AVD, is to select that device from the list (the Nexus 5 is used as an example here as indicated in the figure below), and then click on the ‘Create AVD...’ button. For those that do not have an Android device that is listed, skip this step and go to STEP 9 directly.

A screen similar to the one shown in the figure below, will appear. Note that the ‘AVD Name’ and the ‘Device’ will contain the pre-defined entry – do not edit or change these. The ‘Target’ entry will depend on the SDK packages installed and the lowest entry will be selected – in this case Android 4.4.2. You can change this if you like. Then refer to the specifications of the Nexus 5 and enter the required information into the fields. The final entries (using the Nexus 5 example) will look something like the figure below.


Click the ‘OK’ button to create the new Nexus 5 AVD. A log window will appear (see below) informing you of all the settings for the newly-defined AVD. Note that any error messages will also appear in this window – in this case, there are none. Click on the ‘OK’ button to dismiss the window.

You will be back in the AVD Manager window with the newly created Nexus 5 AVD already selected (see below).

Click on the ‘Start’ button. A window labeled ‘Launch Options’ (shown below) will appear.

Click on the ‘Launch’ button to launch the AVD. A ‘Starting Android Emulator’ window (shown below) will appear. Any error messages that occured during launching of the AVD will be displayed in this window.

Next, the Nexus 5 AVD will be displayed as shown below. Note the flashing ‘android’ sign in the middle if the display.

Once the AVD has finished loading without any errors, the Nexus 5 AVD will appear in it’s full glory (see below). That was fast, wasn’t it? This is only possible with Intel’s Virtualization Technology using Intel Atom x86 CPU/ABI in your AVD plus Linux’s KVM feature and with the PC’s BIOS set up correctly to use this technology.

Click on 'GOT IT' on the welcome sign and the Nexus 5 home screen will appear (shown below)

To test the AVD, click on the ‘Apps’ button (the center icon at bottom) and the screen will change to one as shown below.

To test out an sample app, click on the ‘Browser’ icon – if your PC is connected to to the internet, you should see a screen similar to the one shown below. Note the query below which ask you whether you want to share your location – if so, click on ‘Share location’, else click on ‘Decline’. If you had clicked on ‘Share location’, the screen will change to look like the one shown below.


Type something into the Google search box, using the on-AVD-screen keyboard – for example ‘ubuntu’ (see below).

Then click on the search icon. The page shown below will appear.

Click on the ‘Ubuntu’ (first item shown) that appears on the AVD’s screen. If everything works, the Ubuntu home page will appear (see below).

You can now play around with the Nexus 5 AVD – notice how fast the responses are, thanks to Intel’s Virtualization Technology plus Linux’s KVM features. You can safely close the AVD by clicking on the ‘x’ on the top left hand of the window. You will then be back to the AVD Manager window.
STEP 9: Creating Your Own AVD
If, for some reason or other, the Android device that you possess is not listed under the ‘Device Definitions’ tab of the AVD Manager, you can create one to correspond to your device. First make sure that you have selected the ‘Device Definitions’ tab, then click on the ‘Create Device...’ button. You should see a screen similar to the one shown below.

Now make sure that you have all the details for your Android smartphone ready – search for it on the internet or use your User’s Manual if the details are present in there. As an example, the author has entered the details for his Samsung Galaxy Note 2 in the figure below, then clicked on the ‘Create Device’ button.

You will be back to the AVD Manager window with the ‘Device Definitions’ tab selected. Notice that the device you created will be in the device list (and selected by default). The screen will look like the one shown below.

Note that you have only created a definition for the device but NOT an AVD for that device. To create an AVD, select the newly created device (if it is not already selected), then click on the ‘Create AVD...’ button. You will see a screen similar to the one below. Notice that the ‘AVD Name’, the ‘Device’, and the ‘Target’ entries have been pre-entered from the new device definitions.

You can edit the entries if you so wish, but for this tutorial, leave the entries alone. Note however, a warning message that no CPU/ABI system image has been selected yet will appear at the bottom of the window – do so now by clicking on the down-arrow to the right of the CPU/ABI item on the window and select the CPU as per your device specification. Since my Android smartphone is using the ARM processor, I decided to use the ‘ARM (armeabi-v7a)’ CPU/ABI as I will be testing software on that smartphone itself (more about this later). The ‘Hardware keyboard present’ item was also deselected. Notice that the warning message has now changed to ‘No skin selected’. Change the skin to 'No skin' by clicking on the down arrow on the Skin item and selecting ‘No skin’ from the list. The screen will now look like this.

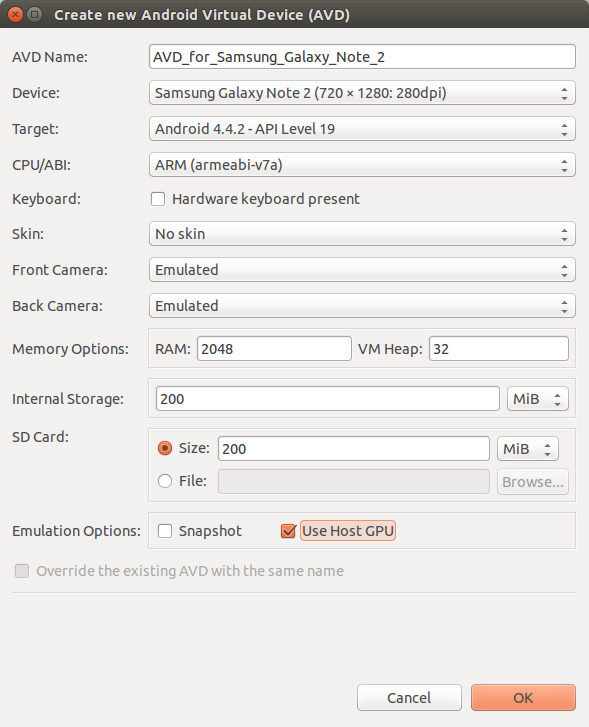
If you have a webcam on your PC, you can use it as your rear camera and/or your front camera. Click on the down-arrow on the ‘Back Camera’ and/or ‘Front Camera’ and select ‘Webcam0’ for the entries. You can safely skip these items or use ‘Emulated’ for both items if you do not have a webcam on your PC. The ‘RAM’, ‘VM Heap’ and ‘Internal Storage’ sizes was pre-selected – you can change this if you wish. Also, if you wish to have a SD card on your AVD, specify the size of this card – I have entered 200 as an example here. To make the AVD perform faster, the use of the host GPU is highly recommended – I have enabled this in the screen shown below.
Click the ‘OK’ button to create the new AVD. A log window will appear (see below) informing you of all the settings for the newly-defined AVD. Note that any error messages will also appear in this window – in this case, there are none. Click on the ‘OK’ button to dismiss the window.

You will be back in the AVD Manager window with the newly created AVD already selected (see below).

To start this AVD, click on the ‘Start...’ button then click the ‘Launch’ button on the Launch Options window that appears next (see below).

The ‘Starting Android Emulator’ window will appear next. The AVD will now load – at a very much slower rate than the Nexus 5 AVD! First, the screen shown below will appear with a flashing ‘android’ sign in the middle of the display.


After a long while, the screen will change as shown below.

Click the ‘OK’ button and the screen will change as shown below.

You can go ahead to play around with this device. Just note that it is very slow to respond to clicks as compared to the Nexus 5 AVD. You can safely close this AVD by clicking on the ‘x’ on the top left hand of the window. You will then be back to the AVD Manager window.
If your PC is using an x86 CPU (from Intel or AMD) and you have set up your BIOS correctly, you can edit the AVD (by clicking on the ‘Edit...’ button) for the newly-created device and change the CPU/ABI to the ‘Intel Atom (x86)’, then click the ‘OK’ button twice to re-create the AVD (see below).


To start the AVD, click on the ‘Start...’ button then click the ‘Launch’ button on the Launch Options window that appears next. The AVD will now load – at a very much faster rate than previously. Unlock the AVD when it has finished loading and you will see the home screen as shown below. This illustrate the power of using the Intel Atom (x86) CPU/ABI together with a capable x86 CPU and Intel’s Virtualization Technology plus Linux’s KVM features with Android Studio on your development PC! Just remember that the hardware virtualization feature only works on x86 compatible CPU's. Also remember that older CPU’s (Intel or AMD) may also not work with these hardware virtualization features. If you are unsure about your CPU's ability to support hardware virtualization, search the internet for help.


Close the AVD when you have finished playing around with it. Then close the AVD Manager and the SDK Manager. Use the ‘Back’ key on Android Studio to go back to the main page.
STEP 10: Create a New Project Using Android Studio
Now that you have successfully installed Oracle’s Java SE and Google’s Android Studio and set up an AVD, it’s time to use Android Studio to develop software for the Android platform. We start off by using Android Studio to write a short and simple ‘Hello, world’ program, which you can run either on your AVD, or your actual Android device.
Launch Android Studio again if it is closed and dismiss any tip screen if it appears (by clicking on the ‘Close’ button). Start a new project by clicking on the ‘Start a new Android Studio project’ item from the Welcome screen (see below).

The ‘New Project’ screen as shown below will appear – fill in the details for the ‘Application name’ to ‘Hello World’ and ‘Company Domain’ to ‘anycompany.com’ as shown. The directory in which this project reside can be anywhere on your PC. In the example shown, I have placed the project in my home folder's ‘Projects’ directory but you are free to use any directory you wish. Then click on the ‘Next’ button.

The ‘Target Android Devices’ screen will appear next (see below). Make sure that the ‘Phone and Tablet’ item is selected. The ‘Minimum SDK’ is pre-selectd to be ‘API 15: Android 4.0.3 (IceCreamSandwich)’ and the reason why is as stated in the note below this field. If you are unsure on which minimum SDK to select, you can click on the ‘Help me choose’ item. For this tutorial, leave it at the pre-selected minimum SDK. Leave the rest of the items as is. Then click on the ‘Next’ button.

The ‘Add an activity to Mobile’ screen will appear next (see below). Select the ‘Blank Activity’ item if it is not pre-selected. Then click on the ‘Next’ button.

The ‘Customize the Activity’ screen will appear next (see below). Change the ‘Activity Name’ to MyActivity and the rest of the items below will change as shown. Then click on the ‘Finish’ button.

Android Studio (the ‘Gradle’ part anyway) will then start building the project as shown below. Note that your project is a basic ‘Hello world’ app that contains some default lines so you do not have to enter those lines into the project. Later you can view the the Java source code for this ‘Hello world’ project in the Android Studio IDE.

When completed, Android Studio will display it’s main IDE screen (see below). If a ‘Tip of the Day’ window appears (also shown below), you can safely close it by clicking on the ‘Close’ button.


If this is the first time you are using Android Studio, the next screen will take some time to appear while the system will carry out initialization of the IDE. After the initialization has finished, a screen similar to the one shown below will appear. Note that it does contain a graphic of a Nexus 4 device with the ‘Hello world!’ text on it. This, however, is NOT the output of the project on your AVD.

To run this project on your AVD emulator that you have created, click on the ‘Run’ button (the one in Android Studio's toolbar that looks like a green-colored right pointing arrow) and the ‘Choose Device’ screen (see below) will appear. Note that the ‘Launch emulator’ item has been selected and that you don’t have any other running device (‘Nothing to show’ will be present in the top half of the window). Select the desired AVD for testing this project – for this example, we will use the Nexus 5 AVD.

Click on the ‘OK’ button and the AVD will start and the screen will change to the ones shown below.


Wait for a while and the ‘Hello world!’ output will appear on the AVD (see below).

After admiring your handiwork, close the AVD and you will be back at Android Studio (see below). Notice that you are now viewing the contents of the ‘activity_my.xml’ tab. For the time being, just ignore any messages shown in the status area at the bottom of the Android Studio's screen.

To view the Java source code for this project, just click on the ‘MyActivity.java’ tab and the screen will change to the one shown below.

Switch back to the ‘activity_my.xml’ tab and run the project again but this time, select the Samsung Galaxy Note 2 AVD instead (see below). Then click on the ‘OK’ button.

The screen will change to ones shown below.

Unlock the AVD and and you will see the ‘Hello world!’ output on the AVD’s screen (see below). Close the AVD after you are done.


STEP 11: Setting Up The Target Android Device
We have successfully tested the ‘Hello World’ project on both the AVD emulators. However, our ultimate goal is that the project should run on an actual Android device (a smartphone, for example). In order to do this, you need to connect that device to our development PC (the PC on which Android Studio is currently running) using a proper USB cable and the proper USB ports.
First you need to enable USB debugging on your device. Usually this setting can found under ‘Settings’ and ‘Developer options’ but it can vary from device to device. On some Android devices, ‘Developer options’ may need to revealed as they are hidden by default. If unsure, consult your ‘User’s Manual’ or the manufacturer’s web page for the information on how to enable USB debugging.

If you find an item labelled ‘Revoke USB debugging authorization’ on your Android device, select that and clear all previous authorization by selecting ‘OK’. Note that if this item is not present on your Android device, you can safely assume that your PC is automatically authorized.

Next we have to make sure that the proper USB cable is used. The manufacturer of your Android device usually provide you with one – use that cable and none other. You also have to make sure that the USB port to be used on your PC is working. Test this port out first by plugging in a thumb drive (or any other USB device) and if the PC recognize this device, you can safely assume that the USB port is working.
Now make sure that Android Studio is running the ‘Hello World’ project. Then connect your Android device to your PC using the USB cable. Dismiss any file manager window on your PC if one pops up. You may need to authorize the USB connection to the smartphone for debugging with the PC’s RSA key by selecting ‘OK’ on your smartphone (see below).


Then click on the ‘Run’ button in Android Studio's toolbar. As usual, the ‘Choose Device’ window will pop up as shown below. Note that the ‘Choose a running device’ item is selected and that device is listed as shown (a Samsung GT-N7100 in this case). Click the ‘OK’ button to run the project on your Android device.

If everything is set up correctly, you should see the ‘Hello world!’ message displayed on your Android device's screen (see below). If not, see if there are any messages on your Android Studio status screen of your PC. If the message mentions authorization (for example), then, most probably you have forgotten to set USB connection authorization on your device. Do it now and retry running the project again. The important thing to note here (if unsuccessful) is that Android Studio will display some message and this usually gives you a clue on what is wrong. If you still run into problems, then I suggest searching the internet with your problem.

You can now close the window on your Android device (usually using the ‘Back’ key). If you examine the apps on your device, you will find an app labelled ‘Hello World’ (see below). This is, of course, the ‘Hello World’ app file (usually with a .apk extension) which Android Studio has downloaded for you. You can delete this file if you so wish. By the way, before you put your Android device aside after testing more new apps developed using Android Studio, remember to switch off USB debugging first.

To close the ‘Hello World’ project on your PC, click on ‘File’ and the ‘Close Project’ menu items on Android Studio. You will be back to the welcome screen and the ‘Hello World’ project will be listed under the ‘Recent Projects’ column (see below). To restart (or reload) the same project, make sure that the project is selected under ‘Recent Projects’ and then double-click the item – that project will then be started.

Final Words:
That's it. You now have a 64-Bit Ubuntu 14.04 PC which can be used to develop Android software. If you are an experienced Intellij, Android Studio, Java and Android programmer, enjoy! For those people who is new to Android Studio and/or Java programming, here are some links which I recommend you visit in order to learn about Android programming.
To learn about the Intellij IDE (on which the Android Studio is based), visit https://www.jetbrains.com/idea/documentation/ for a tutorial on this.
To learn how to use Android Studio for developing Android software, visit https://developer.android.com/training/index.html for a tutorial on this.
If you are new to Java, then I would recommend searching the web for tutorials and the books ‘Java For Dummies, 6th Edition’ and ‘Head First Java, 2nd Edition’ as a guide.
If you are new to Java Programming for Android, then I would recommend searching the web for tutorials and the book ‘Java Programming For Android For Dummies’ as a guide. There is also another book by the same author but is more ‘advanced’ and is targeted towards Android developers. The title of this book is ‘Java Programming For Android Developers For Dummies’.
Happy computing!
No comments:
Post a Comment